Monday, July 27, 2015

Web Workers

OK this will be a big post.
Web workers allow us access to other threads. Threads can be processed by idle processors within the CPU architecture. Multi-processor systems use the same battery power regardless of how many processors are being used, so multi-threading is crucial in battery powered devices.
Lets get to it.

This is from W3SCHOOLS.

First a worker has to exist!
We create a web worker script called "demo_workers.js".


This is the HTML5 code to implement the worker.

The problem is the worker continually processes this code. We need more control over our workers.
This is from HTML5 UNLEASHED.
And here is the workers .JS file.
This is a different usage of web workers. Instead of being continually processed the worker is only called when we need to use it.

OK so lets try and get a worker thread to draw to a canvas.
And here is the workers .JS file.
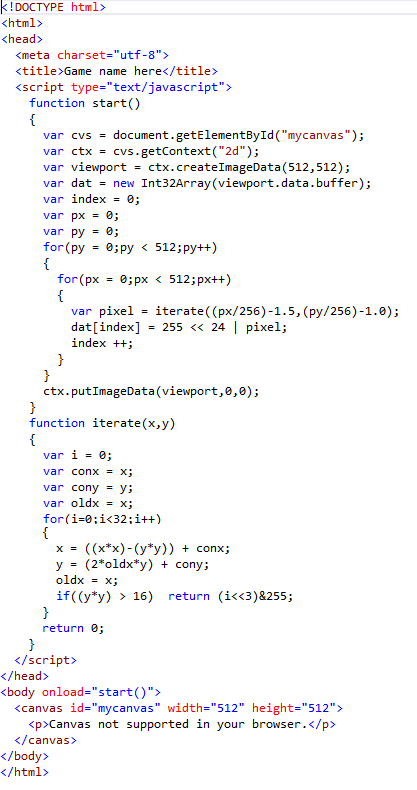
OK as you can see, A canvas is created then we get a 32-bit Typed Array called dat. I am not passing the array to the worker because this will be the final engine that will render Graph3D.
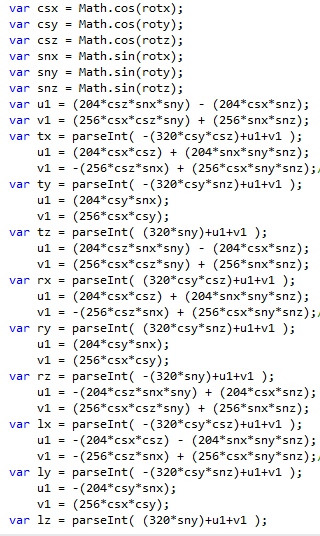
Instead I am going to pass positionx, positiony,positionz,rotationx,rotationy, and rotationz.
Only 6 numbers are sent to the worker this is very efficient.
The worker .JS file, creates a Typed Array called wdat. The first time the worker runs it creates the array, then it processes the 'message'.

A pixel in the canvas has the format
ALPHA << 24 | BLUE<<16|GREEN<<8|RED.
So the alpha value is the color RED.
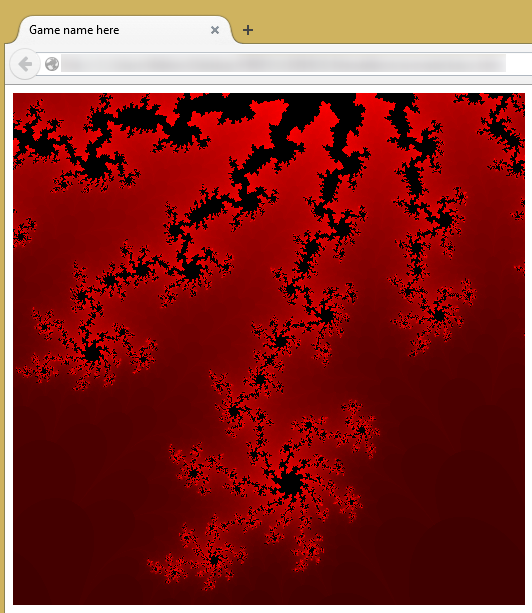
The canvas has a BLUE color as it starts:
After the button is clicked the Worker writes the color red to all pixels on the canvas.
This is a good start.

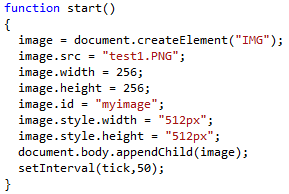
If you enter the code yourself you will notice you have to press the button twice. This is because the message is sent to the worker and the canvas putImageData function draws to the canvas before the worker updates it. To fix this place putImageData in the worker onmessage function like so:
Now when the button is pressed the canvas updates almost instantly. Was worried about how fast it would render, at the moment it is fast enough for my needs.

Works on FireFox and Microsoft Edge, however on Chrome as usual you will get this error.
A possible way to fix this is with the new FILESYSTEM API or buy a domain and set the domain up and get it running just to test a basic scenario. This is a CORS error, use python simple server to serve files to localhost. CORS is a very important internet security system, do not try to circumvent it. Apologies to Google.

OK wrote a version that sends the ImageData to a worker processes it and sends it back. The version I have described is at least 2 times faster. Has a slight problem with synchronization but is much faster. And on my i7 lightening fast.

Have to write a structured cloning version but GC can be expensive, may use the above version.

So now I have FOUR CORES writing to the canvas.
However the UI creates a border around each canvas. The documents body needs a margin of 0.
Also the canvas display needs to be blocked.
Now we have a complete fullscreen written to by FOUR processors.
This will be the final renderer. The most important part is the 3D engine only does 25% of the processing. This will be a massive optimization.

Here is Graph3D with a single processor.
Between 5 FPS - 11 FPS.

And with FOUR processors.
Between 24 FPS - 60 FPS. An immense increase in rendering performance.

** Update **
On an i5 the results are very poor, on an i7 the results are very impressive.


BASE 64

Ok here's another handy way to add image data to your HTML app.
It's the actual JPEG stream, just give it to the IMG tag and...
The textarea will contain the dataURL stream. Just select-all and copy, paste it into IMG tag's SRC propety.

Tuesday, July 21, 2015

Virtual Reality

By placing the accelerometer output directly into graph3d I was able to construct virtual reality instantly.
The accelerometer values of alpha: beta: gamma: are in degrees. Simply multiply the degrees by one radian which is 0.0174532925 to get the radians.

Here is graph3d with the phone looking down at the ground.

Here is graph3d with the phone looking at the roof. Works very well.
I am getting a keyboard for my LG and will be making a virtual reality demo.
Keep you posted.

Sunday, July 12, 2015

3D Rotations

Up until now I have used a 3D camera based on a tripod. Useful for FPS shooters and motor vehicle models. But jet fighter and space ship models require true 3D ZYX rotations. Before I show you the javascript code I have to explain how it works.
This diagram roughly shows the viewport pyramid. The camera or eye is situated at the near plane. At the back plane are three values, tx, rx, and lx. From these three points I can interpolate every co-ordinate within the pyramid. Here is the javascript code.

And here is the output in graph3d. I just made two voxel planes. And did some y and z rotations.

Note the viewing pyramid is 320 x 204 and has 256 slices.

Saturday, July 11, 2015

The Accelerometer

This is the most revolutionary technological advance made in many years. The accelerometer!
Heres the code, remove the title tag or it won't work.
And here it is working on an android phone!
Bare with me, about to show you something amazing.

Saturday, July 4, 2015

Device Camera Pixel Manipulation

This is one of the latest additions to HTML5 and is incredibly useful. Can lead to augmented reality and image recognition.


Here is the code.


Uses most of the elements I have made posts about up until now.
First you will be asked to share the device. Click on share selected device and....

Here it is on FireFox.

Here it is on Microsoft Edge ( very cool ).

The canvas is filled with the devices video. You can then write to dat to add images to the video.
Notice at the top the camera icon? Click this and you can stop the device. That's why the event handlers are there to make sure the canvas isn't written to while video is not streaming.

(Sending video to a domain will allow it to work on Chrome)

Pixel Animation

 *** viewport is used by javascript, use the var name vp instead ***

Was trying to animate the mandelbrot set and it just wouldn't work. Turned on the debugger and found that the var screen was undefined. Replaced it with the word viewport and voila!

Notice I have moved all the canvas variables into global scope. This way the canvas and buffer stays "alive" throughout the life of the application.
After a few seconds the renderer has zoomed in on this.

Thursday, July 2, 2015

Pixel Manipulation

 *** viewport is now used by javascript use the var name vp instead ***

Ok lets have a look at the code.


It's the previous mandelbrot renderer. It has a slight difference. Notice that a new array has been created called dat. It is a typed array of type Int32. It is "attached" to the ImageData object called viewport. Specifically the viewport.data.buffer object. When you write to the new array the viewport array is updated. Also notice that there is less code to write!
Works on FireFox.
Works on Internet Explorer.
Works on Google Chrome.
Works on Android.

The canvas Tag

*** screen is used by javascript, use the var name vp instead ***

Finally the canvas, very powerful HTML5 tag.

It draws the mandelbrot set.
On FireFox.
On Google Chrome.
On Internet Explorer 11.

Next I will draw the mandelbrot set using 32-bit typed arrays.

Here is a zoom in on one of the pixels in the above set.

Typed Arrays

Before I talk about the canvas an understanding of typed arrays is needed. This is from the Mozilla Developer Network. These arrays will help us write to the canvas in a simpler way.

new TypedArray(length);
new TypedArray(typedArray);
new TypedArray(object);
new TypedArray(buffer [, byteOffset [, length]]);

where TypedArray is one of:

Int8Array();
Uint8Array();
Uint8ClampedArray();
Int16Array();
Uint16Array();
Int32Array();
Uint32Array();
Float32Array();
Float64Array();


Image Without The img Tag

I had code that dynamically created an img. The code wouldn't work so I visited W3SCHOOLS and found that 'img' didn't work but "IMG" does.

Notice there is no img Tag.
There is a slight difference. The button is created first so it is displayed first but output is similar.
The file works the same.
This also works.

The img Tag

This is my latest test in recycling data.
Firstly notice the style declaration in the tag. This enlarges the image from 256 x 256 to 512 x 512.
Because the timer is continually running you have to get notified when the src is changed. In a real world application the images onload event will replace the button and onclick event.
The timer is simple to implement and the 50 stands for 50 milliseconds. 1000 / 50 = 20 ticks per second.
 Running the file on firefox gives us this output. On chrome it won't work, the image must be in a domain. Pressing the button at anytime produces this output.

On the server-side all the images are PNG files and compressed. On the client-side the RAM usage remains the same. Recycling the same memory and not creating more memory and overheads.

Wednesday, July 1, 2015

Javascript Arrays

One more post on covering the basics before we get to the canvas.

Arrays in Javascript are similar to other programming language arrays.

This is a dynamic array. Can be created and filled at anytime. Here is the output.

This is a static array, it is created as the HTML5 page is created. Has the same output.
Arrays can be altered after they have been created, all arrays are essentially dynamic. 
***To be safe make sure you never try to access an array beyond it's bounds. I use index%arraylength***